
Notes
From Experience: Wins, Fails, and What Stuck
Don't rush the brine step: A full 24-hour brine makes all the difference. It seasons the chicken throughout while helping it stay tender and juicy after frying. Pat the chicken completely dry: Removing excess moisture before coating helps the flour adhere properly and creates a crisp, even crust. Double coat for maximum crunch. The flour-and-water method creates the signature craggy, crispy edges that Korean fried chicken is famous for. Maintain your oil temperature: Keep the oil close to 180°C. If it drops too low, the coating absorbs oil and becomes greasy. Too hot and the coating will brown before the chicken is cooked. Choose a high-quality gluten-free chicken stock powder. It provides savoury depth throughout the brine and coating using a familiar pantry ingredient, without relying on MSG. Rest before serving. Allow the chicken to rest on a wire rack for a few minutes after frying. This keeps the coating crisp while the juices redistribute. Never reuse the coating mixture. The flour coating comes into contact with raw chicken during the coating process, making it unsuitable for storage or reuse. Always discard any leftover coating after cooking and prepare a fresh batch for each cook. Unused flour that has never come into contact with the chicken or the water dip can be kept.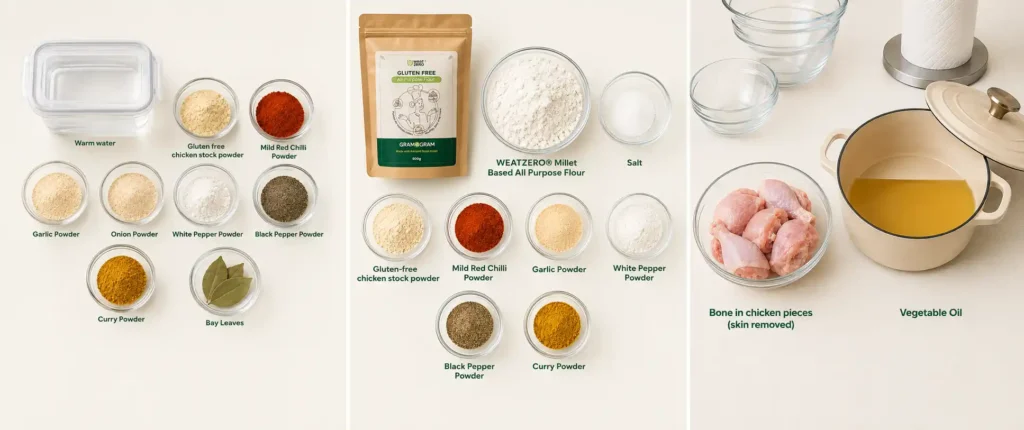
Ingredients
Chicken
- 500 g Bone in chicken pieces - skin removed
Brine
- 1 L Warm water
- 2 tbsp (20g) gluten free chicken stock powder
- 1 tbsp (8g) Mild Red Chilli Powder
- 2 tbsp (16g) Garlic Powder
- 2 tbsp (16g) Onion Powder
- ½ tbsp (4g) White Pepper Powder
- ½ tbsp (4g) Black Pepper Powder
- 1 tbsp (8g) Curry Powder
- 10 Bay Leaves
Crispy Coating
- 500 g WEATZERO® Millet Based All Purpose Flour
- 1 tbsp (18g) Salt
- ½ tbsp (8g) Gluten-free chicken stock powder
- ½ tbsp (4g) Mild Red Chilli Powder
- ½ tbsp (4g) Garlic Powder
- ½ tbsp (4g) White Pepper Powder
- ½ tbsp (4g) Black Pepper Powder
- ½ tbsp (4g) Curry Powder
For Frying
- 4 L Vegetable Oil

weatzero-gluten-free-korean-fried-chicken-equipment
Method
Prepare the Brine
- In a large container, combine the warm water, salt, gluten free chicken stock powder, chilli powder, garlic powder, onion powder, white pepper, black pepper, curry powder and bay leaves. Stir until completely dissolved.

- Add the chicken pieces, ensuring they are fully submerged in the brine.
- Cover and refrigerate for 24 hours.
Prepare the Crispy Coating
- Combine all coating ingredients in a large bowl and whisk until evenly mixed.

- Divide the coating mixture evenly between two medium bowls.

- Fill a separate bowl with cold water.
Fry the Chicken
- Heat the vegetable oil to 180°C in a large heavy based pot.

- Remove the chicken from the brine and pat completely dry with paper towel.
- Coat each piece thoroughly in the first bowl of flour mixture.
- Dip each coated piece briefly into the bowl of cold water.

- Transfer immediately into the second bowl of flour mixture, pressing gently to create an even coating with craggy edges.

- Carefully lower the coated chicken into the hot oil.

- Fry for 8 to 11 minutes, depending on the size of the chicken pieces, until deeply golden, crispy and cooked through.
- Transfer to a wire rack and season lightly with salt while still hot.

- Allow the chicken to rest for 3 to 5 minutes before serving.
Serving Suggestions
- Serve immediately while hot and crispy with your favourite dipping sauce.
- Pair with steamed jasmine rice, kimchi, pickled cucumber, Asian slaw or steamed greens. Finish with sesame seeds, sliced spring onions and fresh lime wedges for a restaurant style meal at home.
